Save
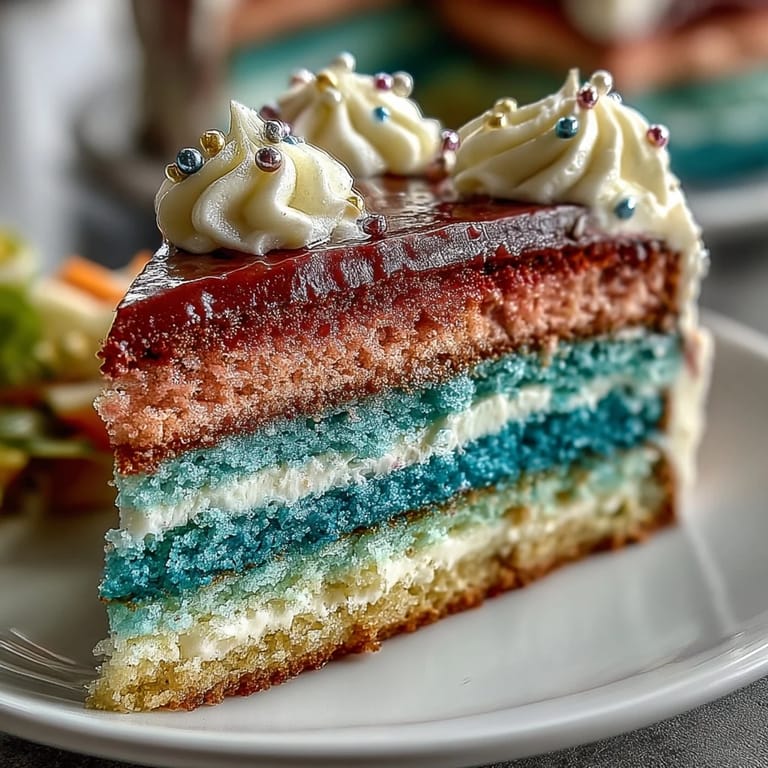
Save My cousin texted me three weeks before her graduation asking if I could bake her cake, and honestly, I panicked for exactly two seconds before deciding to go all in. She wanted something that screamed celebration but wasn't just a boring sheet cake sitting on a table—she wanted layers of color that actually meant something, like the whole journey from freshman to graduation day compressed into frosting and sponge. I'd never made a proper ombre cake before, but there was something about the challenge that felt right for marking such a big moment. The first time I held all four cake pans lined up in my oven, watching them bake to golden perfection, I knew this wasn't just about making dessert.
I'll never forget my cousin's face when she walked into the kitchen and saw those four perfect graduated layers stacked on the stand. She just stood there for a moment, then hugged me so hard I got buttercream in my hair, and suddenly all the stress of tempering egg whites and getting the colors perfectly calibrated felt completely worth it. That cake became the centerpiece of her whole celebration, and people were taking photos of it before they even ate it, which I didn't expect but also absolutely loved.
Ingredients
- All-purpose flour (3 1/4 cups): This is your foundation, and measuring by weight is genuinely worth it if you have a scale—it prevents dense, heavy cakes that nobody wants.
- Baking powder (2 1/2 tsp): Don't skip checking the expiration date; old baking powder makes the cake flat and sad.
- Salt (1/2 tsp): Tiny amount, huge impact—it makes the vanilla sing and keeps the cake from tasting one-dimensional.
- Unsalted butter (1 cup, softened): Room temperature is non-negotiable here; cold butter won't cream properly and you'll lose that light, fluffy crumb everyone expects.
- Granulated sugar (2 cups): This sweetens and aerates the batter, so creaming it with butter for a solid 3–4 minutes actually matters.
- Eggs (4 large, room temperature): Cold eggs can break the emulsion and make the batter weird; pull them out 30 minutes ahead.
- Vanilla extract (1 tbsp): Use real vanilla if you can; it makes a subtle but noticeable difference in the final flavor.
- Whole milk (1 1/4 cups, room temperature): Cold milk can shock the batter and create pockets of uneven texture.
- Gel food coloring in graduation theme colors: Gel is essential because liquid coloring dilutes the batter and ruins the texture; I learned this the hard way with my first attempt.
- Egg whites (6 large for buttercream): Fresh, high-quality eggs make the safest Swiss meringue; the heat brings them to a food-safe temperature.
- Granulated sugar (1 1/2 cups for buttercream): This dissolves into the egg whites and creates that silky, stable texture.
- Unsalted butter (1 1/2 cups, softened and cubed): Soft butter emulsifies smoothly; if it's too cold it gets chunky, if it's too warm the buttercream breaks.
- Vanilla extract (2 tsp): A double hit of vanilla in the buttercream makes it taste like something from a real bakery.
Tired of Takeout? 🥡
Get 10 meals you can make faster than delivery arrives. Seriously.
One email. No spam. Unsubscribe anytime.
Instructions
- Prepare your pans like you mean it:
- Preheat your oven to 350°F and grease those four 8-inch pans thoroughly, then line the bottoms with parchment paper. This sounds fussy, but it's the difference between cakes that slide out easily and ones that stick and tear.
- Mix your dry ingredients first:
- In a medium bowl, whisk together the flour, baking powder, and salt until everything is evenly distributed. This prevents lumps and ensures the leavening is consistent throughout the batter.
- Cream the butter and sugar until it's fluffy:
- Beat them together for about 3–4 minutes until the mixture is pale and looks almost mousse-like. This isn't just a step; it's when you're incorporating air into the batter, which is what makes the cake light and tender.
- Add eggs one at a time:
- Drop each egg in and mix for about 30 seconds before adding the next one, making sure everything is incorporated. If you dump all four eggs in at once, the batter can separate and become weird and grainy.
- Mix in the vanilla:
- Add it now, right after the eggs, so it's fully distributed through the base mixture.
- Alternate the flour and milk in stages:
- Add about a third of the flour mixture, then half the milk, then another third of flour, then the rest of the milk, and finally the last of the flour. Start and end with flour to prevent a thin, curdled-looking batter.
- Divide and tint your batter:
- Scoop the batter into four bowls and add increasing amounts of gel food coloring to each one—start with just a tiny touch in one bowl, then go a bit darker with each successive bowl. You're creating a gradient, so step back and look at them together to see how they compare.
- Pour each color into its own pan:
- Divide evenly and smooth the tops with an offset spatula so they bake evenly. Uneven batter in the pans means uneven cakes.
- Bake with attention:
- Bake for 22–25 minutes until a toothpick inserted in the center comes out clean. Start checking at 22 minutes because ovens vary wildly and overbaked cake is dry and disappointing.
- Cool properly:
- Let the cakes sit in the pans for 10 minutes so they set just enough to hold their shape, then turn them out onto wire racks to cool completely. Rushing this step causes cakes to crack.
- Make the Swiss meringue buttercream:
- Combine egg whites and sugar in a heatproof bowl and set it over a pot of simmering water, whisking constantly until the mixture reaches 160°F. This pasteurizes the eggs and dissolves the sugar so it's silky, not grainy.
- Whip the mixture until cool and fluffy:
- Transfer to a mixer and beat on high for about 10 minutes until you get stiff peaks and the mixture is no longer warm to the touch. This is where the magic happens—you're incorporating air and the buttercream becomes voluminous and light.
- Add the butter gradually:
- Add it a few cubes at a time, mixing well between additions. If you throw it all in at once, the buttercream can look broken and separated; taking it slow ensures a smooth, creamy emulsion.
- Finish with vanilla and color:
- Stir in the vanilla, then divide the buttercream into portions and tint each one to match your cake colors if you want an ombre frosting effect. Or keep it mostly white and just use the colored buttercream for piping accents.
- Assemble with care:
- Place the darkest cake layer on your cake stand, spread with a generous layer of buttercream, then stack the next darkest, and so on, ending with the lightest layer on top. This creates the visual ombre effect you're going for.
- Apply a crumb coat:
- Spread a thin, even layer of buttercream over the entire cake and chill it for 20 minutes. This seals in the crumbs so your final frosting looks pristine and professional.
- Frost the final layer:
- Apply your final coat of buttercream, blending the colors if you want that seamless ombre transition, or being bold with contrasting colors if that's your vibe. Use an offset spatula and a turntable if you have one; it makes everything smoother and easier.
- Decorate and celebrate:
- Add edible pearls, a graduation topper, piped details, or whatever makes you happy. Let the cake chill until set, then bring it to room temperature for serving so the flavors are at their best.
 Save
Save The best part happened when my cousin sent me a photo weeks later of a slice of cake still sitting in her fridge with a note written on the container: "Saved for nostalgia." That moment made me understand that a beautiful cake isn't really about impressing people—it's about creating something tangible they want to hold onto. Food has this weird power to mark time, and this cake became a physical memory of a major milestone in her life.
Why Color Matters in Celebration Cakes
When you're baking for an occasion, the visual impact is almost as important as the taste, especially for milestones like graduations. An ombre cake isn't just prettier; it tells a story—it suggests progress, transformation, journey—which is exactly what graduation is about. The gradient from dark to light can represent freshman year to senior year, or school colors fading to white for a new beginning, or really whatever narrative you want to bake into it. I've noticed that people remember cakes they've seen more vividly than cakes they've just eaten, so the color work actually matters for the memory.
The Swiss Meringue Buttercream Advantage
Regular American buttercream is mostly butter and powdered sugar, which is delicious but can feel heavy and overly sweet, especially on a celebration cake. Swiss meringue buttercream is lighter, less sweet, and has this silky texture that feels luxurious and tastes like you hired a pastry chef. The egg whites are heated to pasteurization temperature, so you don't have to worry about food safety, and the technique creates an emulsion that's genuinely foolproof once you understand the temperature and softness of your butter. I've made this buttercream dozens of times now, and it's become my go-to for any cake that needs to feel special.
Troubleshooting and Smart Moves
Baking a four-layer cake is ambitious, but it's also very survivable if you know what might go wrong and how to fix it quickly. Uneven cake layers can be trimmed flat with a serrated knife or a cake leveler, so don't stress if they're slightly domed on top. If your buttercream breaks while you're mixing, usually it just needs to be warmed up slightly or beaten a bit more, and it'll come back together; I've been there, and it's never actually ruined. Timing-wise, you can bake the cakes a day ahead and wrap them tightly, and you can make the buttercream the morning of assembly, so don't feel like everything has to happen in one frantic afternoon.
- If your gel food coloring isn't giving you the intensity you want, use a toothpick to add more instead of pouring it in, because it's easier to darken than to lighten.
- A cake turntable makes frosting so much easier and faster, and they're cheap enough that they're worth having in your kitchen if you ever make layer cakes.
- Chill the cake after the crumb coat even if you're in a hurry; it genuinely makes the final frosting look smoother and more professional.
 Save
Save This cake has become my signature for big moments, and every time I make it, I think about my cousin and how a cake ended up being part of her graduation story. It's a reminder that the food we make and share is never really just about feeding people; it's about marking moments and saying, "This day matters, and so do you."
Recipe FAQs
- → How do I achieve the ombre effect in the layers?
Divide the batter into equal portions, then add increasing amounts of gel food coloring to each, creating a gradient from light to dark before baking.
- → What is the best way to make Swiss meringue buttercream?
Whisk egg whites and sugar over simmering water until warm and sugar dissolves, then whip until stiff peaks form before gradually adding softened butter and flavoring.
- → Can I prepare the cake layers in advance?
Yes, layers can be baked and cooled completely, then wrapped and stored in the refrigerator or freezer before assembling.
- → What tools are recommended for decorating the cake?
Use piping bags with decorative tips, an offset spatula for smoothing buttercream, and optional edible pearls or themed toppers for finishing touches.
- → How should I store the finished cake?
Chill until set, then bring to room temperature before serving to enjoy optimal texture and flavor.